If you usually work with audio, then you’ve probably noticed how poorly Windows handles audio routing.
Sending an application’s audio output as an input into another application is surprisingly difficult.
Unless you work with Virtual Audio Cable.
Virtual Audio Cable was originally designed for Windows 98, but it still holds up.
It does exactly what the name implies — it acts as a virtual cable, sending your audio output to another application as an input.
Virtual Audio Cable is very useful if you do mixing and sampling based on your desktop’s audio.
It also allows you to reroute audio in order to play things through your microphone.
This means that you could play an online game and play songs through its voice functionality.
For most internet, TV, and residential service consumers, Spectrum cable is the go-to service provider when you’re looking for a great price tag on an amazing bundle deal or even a standalone plan.
How to Use Virtual Audio Cable
First and foremost, you’re going to need to download Virtual Audio Cable.
To do so, you need to head into its website and download VB-Cable.
It will probably come in a compressed file which you will need to extract with an application such as WinRAR.
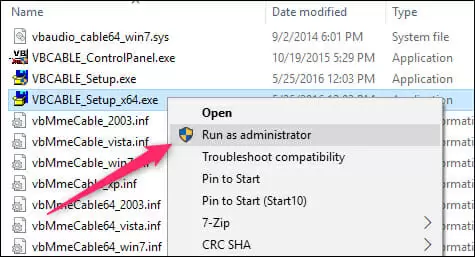
Once extracted, you will want to run as an administrator “VBCABLE_Setup_x64.exe” — the file shown in the image above.
Using the install wizard is easy and intuitive.
You just need to click on the “Install Driver” button and wait for everything to install.
If your computer asks for you to restart it, then do so.
Everything should be up and running after rebooting.
Now, in order to use Virtual Audio Cable you will need to right-click on the volume icon in your system tray, on the bottom right side of your screen, and head into “Sounds”.
On the “Playback” tab you’ll want to select as the default device the new “CABLE input”.
If you have lots of different speakers you will probably need to scroll a bit until you find it.
Otherwise it should be immediately near the top of the list.
Once you’ve set it as the default playback option, you need to head into “Recording” and do the same for the “CABLE output” device.
Now, everything you play on your desktop will be rerouted to your microphone.
Simply select CABLE input as your microphone in whatever application you’re using and try it out.

Petr is a serial tech entrepreneur and the CEO of Apro Software, a machine learning company. Whenever he’s not blogging about technology for itechgyan.com or softwarebattle.com, Petr enjoys playing sports and going to the movies. He’s also deeply interested about mediation, Buddhism and biohacking.

