There’s probably no reason for using your service provider’s DNS addresses. Those DNS addresses are usually slower, since your browser needs to look up the IP address of every website you try to access, and might even block some websites.
Changing your DNS address in many cases increases your internet speed and allows you to circumvent banned websites. In this detailed article we’re going to teach you how to change your DNS address to two of the most used ones: Google’s and Open DNS’s.
How Does DNS Work?
DNS stands for Domain Name System and it basically transforms names into IP addresses.
For instance, when you go to Google, you type in “Google.com”, yet the computer doesn’t perceive it at such. The computer needs an IP address, and it’s the DNS function to tell the computer exactly where that IP address is.
It works pretty much like a phonebook. The DNS looks up what’s the IP address of a given domain name and it connects you to it. The problem is that your ISP DNS address might be too slow to go through the phonebook.
How to Change Your DNS Address
Like we’ve said, using another DNS address other than your ISP’s has several advantages. Changing it is quite simple, and you can always revert the changes at any given time. There’s no limit to how many times you can change your DNS address.
Two commonly used DNS addresses are Google’s and Open DNS. Open DNS offers more than a simple DNS address if you register an account with them, but for our purposes, the difference between the two are relatively little.
Here’s how you change your DNS address in Windows 7, 8, 8.1 and Windows 10:
- Go to the Control Panel (press the Start Button and type Control Panel).
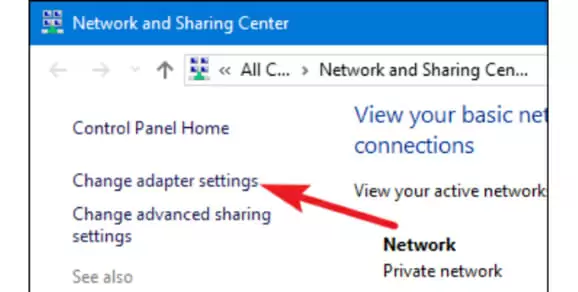
- Open the Network and Sharing Center.
- Choose Change Adapter Settings on the left side of the window.
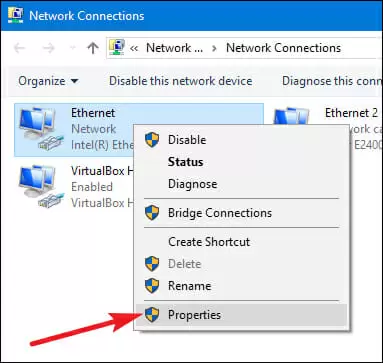
- Right-click on your connection and choose Properties.
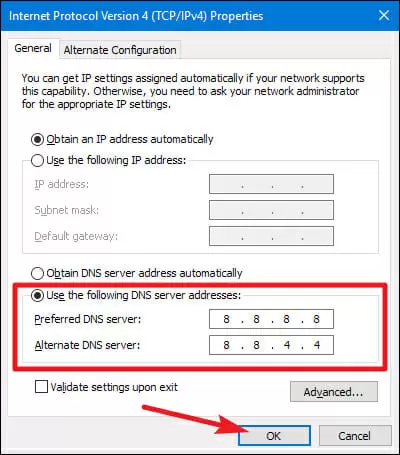
- Under “This connection uses the following items:” scroll down until you find “Inter Protocol Version 4 (TCP /IPv4)”, select it and click on Properties.
- On the lower half of the window click on Use the following DNS server address.The numbers you will type in are different whether you want to use Google’s DNS or Open DNS.
For Google: - Under Preferred DNS server type in 8.8.8 and under the Alternate DNS server type in 8.8.4.4 and press OK.And for Open DNS:
- Under Preferred DNS server type in 67.222.222 and under the Alternate DNS server type in 208.67.220.220 and press OK.
And that’s it. You’ve changed your DNS address. There’s a chance that you won’t notice any differences in your day-to-day browsing, but it will usually lead to an increase in page-loading speed.
If you have any other doubts regarding how to change your DNS and whether you should do it or not, let us know. We’re here to help you.

Petr is a serial tech entrepreneur and the CEO of Apro Software, a machine learning company. Whenever he’s not blogging about technology for itechgyan.com or softwarebattle.com, Petr enjoys playing sports and going to the movies. He’s also deeply interested about mediation, Buddhism and biohacking.


